What Are Resource Packs?
Minecraft originally released in 2009 which gave the game a very unique graphical style that sets itself apart from other games. This design has a unique tone that has supported its reign throughout the years. Though “Resource Packs” are now the new term for it, Minecraft originally supported “Texture Packs”, those texture packs allowed you to customize only the textures and graphical style of Minecraft. After the Java Edition’s Horse update (version 1.6.1), texture packs were replaced by the resource pack system. Resource packs could now let you customize the game’s textures, music, sounds and more! They can be a great way to take that pixelated, blocky look, and transform your world into a HD, hyper-realistic, modern one that brings pieces of your reality into the game! These packs can enhance your gaming experience by allowing you to fully immerse yourself into your world.
Why Create Your Own Resource Pack?
Many build artists use custom resource packs to perfect their build to give off a tone that matches with their intended theme, others may create a pack for more practical uses, others still might create one based off their favorite media (Mario, Adventure Time, etc.). After all, Minecraft is about creativity, customizability, and letting your imagination run wild, and what better way than by creating your own resource pack? Changing the visuals and sounds, will let you immerse yourself into a different branch of build ideas custom to your resource pack. Whether you want to do a more modern build, a dungeonesque build, a hyper-realistic build, or even a stylized cute/cartoon build, resource packs are like the cherry-on-top that give your build exactly the final style you want!
This guide will go into how you can create your own custom resource packs for your worlds. This guide even goes beyond just creating and replacing the textures, and explains the deeper intricacies of creating a texture pack like selecting themes and palettes!
Choosing the Right Tools
By now, we hope that we’ve helped you make up your mind on whether, and why, you’ll be creating a resource pack. Are you creating it for yourself, your friends and family, a personal project, or are you putting it out into the Minecraft community? No matter what your cause and motivation, the fact remains that you’ll need a good set of digital art tools for your fantastic new resource pack.
The art form used most commonly for Minecraft resource packs is called pixel art — and for it, we will need digital art software. There are multitudes of digital art, editing and photo-manipulation tools on the market — essentially, any software or program that can process or edit images can function as your canvas for your shiny new resource pack.
However, there are, of course, factors to consider: such as cost, ease of learning, tools, and more. As such, among them all, just a few stand out for our purpose of resource-pack creation.
We’ve considered all the options, and came up with this list of programs that are the best for all your resource-pack creation needs. Of course, if you’ve already got a program of choice in mind, feel free to skip ahead to read up on how to choose a theme and palette for your pack!

Aseprite

The fact that Aseprite is higher on this list than programs like Adobe Photoshop might come as a surprise to graphic design aficionados out there. While it might not have the household popularity of Photoshop, Aseprite is definitely one of the best ones on the market for pixel artists everywhere.
While it isn’t free, it also costs just a one-time fee of $15 on Steam, making it a relatively inexpensive and affordable option, especially if you’re planning on pursuing pixel art creation as a hobby or profession. Investing in a solid digital / pixel art program is also especially worth it if you’re looking to become a Minecraft Marketplace partner, seeing as it’s a relatively small investment for huge potential in career growth.
As a side note, you are in fact able to get Aseprite for free if you’re willing to learn how to compile it yourself.
Aseprite is extremely popular, due to its lightweight yet elegant interface that seems simple on the surface but holds many, many useful tools for pixel artists. It comes with all the industry standard digital art features like layers, palette control, alpha channels, color wheel selection, shading mode, custom brushes and blend modes.
However, being custom tailored for pixel art, it also adds a ton of functionality to ensure your pixel art comes out looking great. Aseprite adjusts your brushstrokes to ensure that they look perfect, takes into account pixel distortions when adjusting or rotating sprites, and comes with a tile mode for those looking to view their work in a grid form (great for tile set design!)
It also has extraordinary support for animation, making it perfect for resource pack creators who want to go above and beyond with animated block textures, which are explained below in the “Understanding Resource Packs” section. Aseprite provides onion skinning tools (the ability to overlay frames before and after the one you’re currently working on), and a lovely timeline feature just to help you out a little more in previewing your animations.
In all, Aseprite is one of the best programs on the market for the purpose of pixel art creation, and professional pixel artists at Team Visionary have highly recommended it for aspiring Minecraft resource pack, skin and texture artists.
Photoshop Tools
![]()
(Image courtesy of Ryan Boyle)
Of course, one of the strongest contenders on the list is Adobe Photoshop, one of the leading image-editing software packages on the market. However, with its infamous monthly fee, Photoshop can be a massive investment — one that not all of us want to or are able to take.
That being said, however, if you’re looking to get into graphic design, image editing and digital art, and/or you have the disposable income available, Adobe Photoshop is absolutely a worthwhile investment and must-have. It’s famous for a reason, after all, and its flexibility will lend a hand to all your image editing projects in the future.
In terms of making your own Minecraft resource pack, while it is not specifically tailor made for pixel art, it most certainly has all the tools you’ll ever need for professional grade pixel art creation (and a ton more other art forms). It’s also a huge plus to get used to Photoshop early if you’re planning on creating or learning more art forms in the future, as you won’t have to learn how to use several different programs. Plus, if you’re working towards a career that involves digital art or texturing, knowing Photoshop is a must.
Lastly, one of the best things about Photoshop is the large amount of community and official resources available. With its popularity, there are countless scripts, plugins, brushes, tutorials, and such out there that will make your life lots easier. Simply unmatched by most of its free and paid competitors, it’s undoubtedly one of the best programs for anything related to graphics.
Pixlr

A browser-based image-editing software package called Pixlr is my go-to editor in a cinch whenever I’m stuck having to use a system without Photoshop. While it might not have all the fancy functionalities of Photoshop, the advanced version of it supports brushes, selection, transparency and a whole lot of other tools that you can use to create your resource pack.
While I wouldn’t recommend Pixlr as a long-term image-editing solution, it’s fantastic when you’re working on the go, due to it being a browser program — therefore not requiring any installation or long download times. For inspiration why not take a look at the Team Visionary Build Shop for some great examples.
MSPaint / Preinstalled Free Programs
While programs like MSPaint can technically be used for resource pack creation, it’s not recommended.
Firstly, the tools that basic programs such as MSPaint have are not nearly enough to create the quality art that you surely want your brand new resource pack to have. While it has brushes, blur tools, and whatnot, you’ll be aching for the more advanced functionalities like blending capabilities, hue / saturation / luminance adjustments, animation support, and most importantly, the boon and bane of all digital artists: layers!
Plus, these programs often do not have transparency support, meaning no transparency in your blocks, textures and items. Unfortunately, that would look pretty dreadful in-game and most certainly ruin the resource pack you’ve spent hours on.
While it might be easier, quicker and cheaper to just go rifling through preinstalled image editors on your PC or Mac, we highly recommend an alternative program from the list above.
Drawing Tablets
Other than digital art programs, there is a second, very important part to creating digital art — your drawing tool. Of course, it’s entirely possible to create astonishingly beautiful, professional-grade pixel art with your mouse. However, this takes practice, and is inarguably a little more clunky than being able to draw directly with a pen. This is where drawing tablets come in.
Once again, we understand that this is a huge investment that not everyone can or are willing to make. However, as always, if you are looking to delve into a career of digital art and drawing, image editing and photo manipulation, having a drawing tablet around would be extremely helpful. You can get a cheap drawing tablet for less than $50 USD if you shop around, or a graphic screen tablet for over $200 USD.
Some great tablet brands to look out for are Wacom and Huion, two of the largest drawing tablet producers on the market.
Understanding the Resource Pack System
Since you’re going to be creating a resource pack, it’s imperative that you learn and understand the system that resource packs work under. Minecraft uses many, many different file types to alter the appearance and feel of your game. Differing slightly from our article “Everything You Need to Know About Making a Minecraft Skin”, the template of resource racks needs to be discussed on multiple levels. The file structure, template of the different texture files also needs to be detailed and discussed as well as the separate, yet integrated, sounds.
File Structure – Where are the default textures?
Before you begin getting creative with your resource packs, you could be asking yourself a bunch of questions like, how are these textures organized and where even are the textures? Fortunately, if you’ve already downloaded Minecraft, you have all the textures you need! These steps below will help you to find and understand the folder structure and file labelling.
Programs needed:
Minecraft
WinRAR/WinZip/7Zip (WinRAR is used in this guide)
Download the version of Minecraft you want to create a resource pack for, this guide will be for version 1.16.4.
Open the Windows Search Bar located in the Start menu and search for “%appdata%”.
Open the folder that is labelled as “.minecraft”.
Navigate to “\versions\1.16.4” (or whichever release version).
Copy and paste the 1.16.4.jar file into an empty folder, then right-click and hit “Extract Here”. This is your base resource pack folder.
Then, you’re going to dive into the folders thrice, navigate to “\assets\minecraft\textures”.
If you’re looking for a specific asset, searching for the block or entity by name will likely give you the best results.
Now this is where your imagination and skills can run wild, this folder filled with other folders is the meat of your texture packs, the textures and images themselves! To find a specific texture, open the folder that best describes the object that will be texturized. For most blocks, \blocks will suffice, however, if you will be texturing animals, mobs, or blocks that have moving parts, the folder named \entities might be somewhere you will have to look as well. For example, the Minecraft bell is in both blocks and entities; in this case, searching from the \textures folder might work best.
Minecraft textures are wide and varying within the game, but they get even more extensive when you look in its file system. The most used texture templates in Minecraft are 16×16 blocks, entities, and menus.
File Template – Which sections of the texture image are seen in game?
16×16
The 16×16 block is the most common item you will ever see in Minecraft, it makes sense that such an asset has the most textures. Fortunately for us, both the naming of the files and the template is simple enough. Since some blocks use different textures on different sides of the block, the names of those textures are described in the naming scheme of the files, I.E. “grass_block_side”
Subsequently, the names of the image files describe them using the names we know from playing the game, and multi block items, like doors, are specifically labelled to differentiate between two parts of the same item as well.
For example “acacia_door_bottom.png” vs. “acacia_door_top.png”, so searching for these textures using such a labelling scheme is a cinch. Use one of our recommended image editor programs to edit the texture to your style and replace the default image with your own image it must be titled with the same name and within the same folder to be used correctly.
While 16×16 blocks are very common, a lesser common variant is the animated 16×16 blocks. The animations of these blocks and items are all in the same image file. Taking the “kelp_plant.png” image as an example:
![]()
The image above is exactly what the file looks like in the default image folders, though it may look like a lot, the animations are in order from top to bottom in 16×16 pixel sections. The final animation of the above image looks like this in the game:

Subsequently, this is how every animation works in the game. So, even when you consider the “fire_0.png” or “fire_1.png”, while the images are much bigger, the concept of how these animated textures work is still the same. However, growth cycles of plants like wheat or potatoes are counted as individual blocks and different files in stages, “potato_stage0.png” to “potato_stage3.png”
Entities/Models
Animals, mobs, and blocks, like chests, enchanting tables, and bells, are just some of the entities available for customization. There’s dozens of different entities within the game and almost every one of them has its own template. Why not take a look at our Minecraft Market place area for some ideas and concepts for entities and models.
Nearly every entity in Minecraft is unique in shape and size, and thus it’s useful to have a template translated for reference, so we’ll be using a cow as an example. Though the corresponding locations of textures to models is different for other entities, the general color and structure of the template itself is consistent.

This image is courtesy of user robothacker.
Taking a first look at this image likely makes you wonder if your cable TV is broken, but upon closer inspection every single color and location is labelled and has a reason. Before looking, note that every white space is intended to be transparent and the image is to be saved as a .png file. As we look to each portion of the cow, head, body, legs, udders, and horns, we see each portion of the cow’s “blocks”, front, back, top, bottom, left, right, which are all labelled accordingly. Normally, the texture for cows in Minecraft is 64×32 pixels, however note that the template images from the linked source above are up scaled by 20x or 10x, either 1280×640 pixels or 640×320 pixels.
GUI
The GUI could be one of the most important, if not most important, aspects of your texture pack. To begin, GUI stands for Graphical User Interface. Within the game, this can mean everything from the menus in chests or furnaces, to your hunger bar, your health bar, to a bosses health bar, etc. This guide helps you to understand the relatively complex nature of GUI templates.
The GUI files are all conveniently located in one folder “TutResourcePack\assets \minecraft\textures\gui” making for easier customization.
One of the greatest things about Minecraft is that the developers have made customization incredibly easy to learn, but with a learning curve. GUIs present you with canvas and let you paint, for example let’s breakdown a couple of your base GUIs, starting with the inventory.
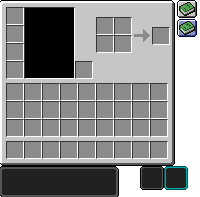
If you’ve been playing Minecraft for years, or maybe even minutes, you’ll recognize this image down to your core, it’s changed somewhat in recent years, but largely remains the same. By default, each box is 16×16, starting from the left with the upper-half of the inventory GUI, you have your 4 armor-piece inventory slots down the column, a black box to view your character in, an inventory slot for your shield, and the 2×2 crafting grid. Below all of those is your ever-present 27 inventory slots and your 9 hot bar slots.
Now, going outside the box, the green books on the right are to visually determine if your recipe book is open or not. Lastly, the three dark boxes along the bottom are all for your potions effects. The larger box on the bottom-left is to show potion effects while you are in your inventory, while the other two smaller ones are used to show the icons for potion effects when you’re hunting, fishing, or mining.
Enchantment Table
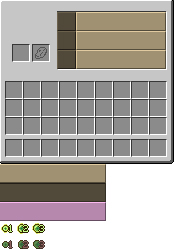
If you’ve played Minecraft enough, or read the subtitle for this section, then you’d recognize this as the Enchantment Table’s GUI. Starting from top to bottom and left to right, the first box you see is for the item you want enchanted to go, the second box is where the lapis lazuli would go. With the lapis box, you will have to customize the outline within your GUI image for it to correspond to your textured lapis, and right next to those boxes is the enchantments.
Finally, the always-there inventory box and hot bar are below all of those. Now, moving outside the GUI box, the first brown-yellowish box is for obtainable enchantments, the second darker brown-yellowish box is for the unobtainable enchantments, and the pinkish-purple color box is the selected boxes for the enchantments you have… almost decided on which enchantment you want.
The selected portion of the enchantments becomes that pinkish-purple color when you hover your mouse or use your joystick to choose your pick of enchantments. Last of all, are the textures that tell you how many levels the enchantment you want will cost your XP bar. The number is always between 1-3 and the only difference between these two rows is whether your XP bar is able to afford those enchantments. The top row (green text, bright, and vibrant) means you’re able to obtain the enchantments, and the bottom row (red text, darkened) means you’re unable to obtain those enchantments.
Overall, you can see that once you break-down the GUI textures, and especially if you have an extensive background in Minecraft, figuring out which parts of the GUI textures correlate to the game becomes much easier to do.
Sounds – How can I add sounds to my resource pack?
After having understood the file structure within the \textures and \assets folders you might be wondering how you can get started with altering the sounds. Well, look no further, this guide has that too!
Minecraft’s default sounds are not stored in any of the common sound formats, the game instead uses a different file structure and file type. So unlike the previous sections where the images were nicely labelled and organized already, with sounds you’ll have to create the folders yourself, but the labelling of folders and files is given. For resource packs, the sound file type you should be using is “.ogg” files. Just follow the steps below and you’ll be set and on your way to creating your own custom sounds!
How do I add sounds to my resource pack?
In your resource pack folder, create a “\sounds” folder with this file path: “TutResourcePack\assets\minecraft\sounds”
This is where all the sound files you create will be organized into.
Open the Windows Search Bar located in the Start menu and search for “%appdata%”.
Open the folder labelled “.minecraft”.
Then navigate to “\assets\indexes”.
Inside this folder there should be a file with the version you intend to use for your resource pack, in my case, the file is labelled “1.16.json”.
Open this file in a text editor software to view the code.
Once you have it open, use CTRL+F to search for the sound you wish to replace.
I.e. if you want to change the sound of chests opening or closing, then search for “chest”.
Keep this file open if you’re going to be doing more sound changes.
Once you have found the sound you want, use the file path that’s written there to create your needed folders.
“minecraft/sounds/random/chestclosed.ogg” should mean that you create a new folder “random” inside the first folder you created in step 1 and place your sound file with the same name in there.
Once you’ve added that folder, simply place your “.ogg” file inside said folder.
Congratulations, you’ve successfully added a sound to your resource pack!
So, to reiterate, you will be placing your new sound files in the structure given to you through your version’s “.json” file. Organize your folders as determined by the developers and you should have little issues getting the sounds to work!
If you’re having trouble getting your sounds to sound exactly how you want it, don’t be afraid to get creative or make mistakes! For example, according to one of the sound designers, C418, the sounds of ghasts were actually made by a cat being startled awake! If you’re interested in looking more into audio design and getting creative, check out Foley artists and how they use everyday objects to create natural (or unnatural) sounds.
Choosing a Theme for Your Pack
Now, that you’ve got all the basics down, it’s time to actually get started! The first step of any sort of content creation, of course, is to decide on what exactly you’re looking to make. It’s at this point that you should properly think about why you’re looking up an article called Everything You Need to Know About Making a Minecraft Resource Pack.
Are you looking to create a resource pack for your family’s or your friends’ personal use? If so, the possibilities are endless! You can include inside jokes and references, mix and match themes, and pretty much do whatever you want — and kudos, by the way, for taking on the gargantuan task of making a resource pack.
Maybe you’re making this resource pack for a survival map, adventure map or mashup pack. In this case, it’s extremely important to communicate with your game designers, level designers, builders and marketing managers to ensure that your resource pack fits the gameplay and thematic needs of your project. Is the resource pack for public download?
Then again, are you simply making this resource pack to be put out into the world, free for players to download or enjoy? Is it for sale on the Minecraft Marketplace, Patreon, or some other platform for content creators? This is where you’ll need to choose a theme from scratch, all by yourself.
Choosing a Target Audience
Firstly, you’ll need to consider your target audience. What part of the Minecraft player base are you trying to appeal to, and what kind of players?
Are you a competitive Factions, PvP or otherwise combative player, trying to create a pack for players like yourself. This means that you’ll most likely have to start with low resolution textures, simple but charming item sprites, and low obstruction UIs — for instance, no fire overlay.
Tropes and Themes
Perhaps you’re a fan of medieval RPGs and have just been inspired by your seventeenth play through of Elder Scrolls V: Skyrim (trust me, I’ve been there…) That’s great! A medieval theme is great to start off with, fits in very well with most of Minecraft’s blocks, and has plenty of marketing potential with a wide audience. Look up some reference pictures from the multitude of RPG tile sets and textures in the world of video games, and get cracking!
Maybe you think there’s not enough cute, pastel resource packs for the younger and casual players; and you want to make some to fill that niche. I wholeheartedly agree — go for it! Maybe you’re tired of gritty nature and want to enjoy Minecraft from within a sleek mansion — there’s plenty of modern minimalistic packs out there for reference!
Maybe instead of Skyrim, you spent the last week of your quarantine binging Doctor Who (somehow, I’ve been there too…), and you feel like designing a world of aliens, sci-fi and technology for others to enjoy. This can be a little tough, given that none of Minecraft’s blocks are innately very “high-tech”, but there are definitely tons of futuristic texture packs that make the blocks into creative, futuristic counterparts.
If you’re stuck, you can always visit art / game design / Minecraft communities such as DeviantArt, Reddit, Planet Minecraft and similar platforms for inspiration. And of course, if you’re not sure what sort of resource packs other people want to see in the world, ask! More often than not, people are more than willing to throw ideas at you for your consideration.
Color Palettes
Besides your theme, color palettes are also vitally important to making sure your resource pack looks good. After all, you could have the best and most creative ideas in the world, but if they don’t end up looking good on the canvas, it’s not likely that your resource pack will take off.
As such, it’s incredibly important to know at least basic color theory before starting on your resource pack creation journey. I mentioned in our other article, Everything You Need To Know About Creating Your Own Minecraft Skin, that there is no way for the concept of color theory to be taught within one article — and that still holds true even now. There are lots of articles online about the concept, however, and we highly recommend reading up on a few of them before you begin.
Great Packs for Reference
Artistry is about taking an idea or object and placing it onto your canvas, fortunately resource packs are not much different. References are among the most important aspects of a long-working art project and luckily this guide has plenty of them to gain insight and ideas from.
Starting off with the classic, no matter how you play Minecraft, it’s difficult for us to move away from the default textures we know and love to this day. That said, some resource pack artists feel the same way, take a look at these Vanilla-inspired resource packs!
Faithful 32×32
Faithful is among one of the more classically known resource packs around Minecraft’s Java community, it adds so much more detail while still giving you the look and feel of Vanilla Minecraft.

Lithos:Core 32x
Lithos:Core does what Faithful doesn’t, they retextured their pack to be a cross between a stylized one that doesn’t stray too far from Vanilla Minecraft, and a pack that sees more realistic animals or enemies. The pixelized look is one that’s apparent and the next-level detail is amazing!
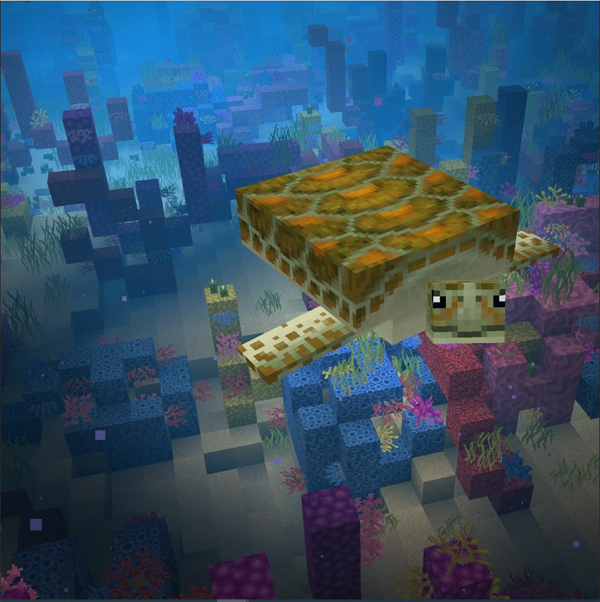
PureBDcraft
PureBDcraft is among one of the most well-known resource packs, and that’s not for no reason! It has a beautiful comic and cartoony style of art that shows artistic dedication to the pack.
If you’re looking for even more stylized packs to reference, check out our other article on the “Best Beautiful Stylized Minecraft Resource Packs”. PureBDcraft is in that article as well, but it’s a pack so nice, that we had to name it twice!
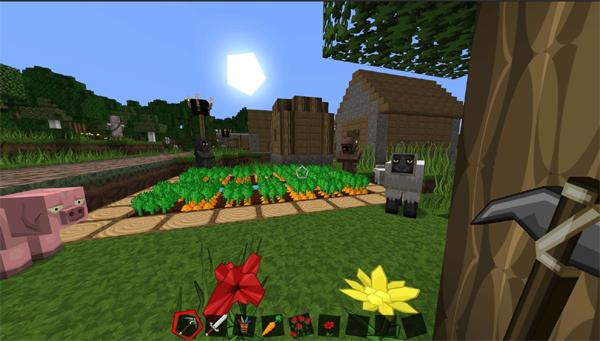
Modern Textures HD
Now, if you’re looking for more realistic or modern references for your resource pack, then look no further than Modern Textures HD, the pack takes those hyper-pixelated, blocky looking blocks and transforms the whole look of Minecraft into one that’s smoother, down-to-earth, and (as named) modern!

Conclusion
Thanks for the read! While making your own Minecraft resource pack can seem like a daunting task, it’s so, so rewarding to exercise absolute control over how your Minecraft world looks, sounds and feels like. This is especially the case as very few games give you the opportunity to freely (and for free) change the appearance of their game like this.
We hope that this gave you not only on the technical how-to on Minecraft Resource Pack creation, but also some insight on how to create a good looking one that you’re happy with.

